Cherry Hand Pies Recipe
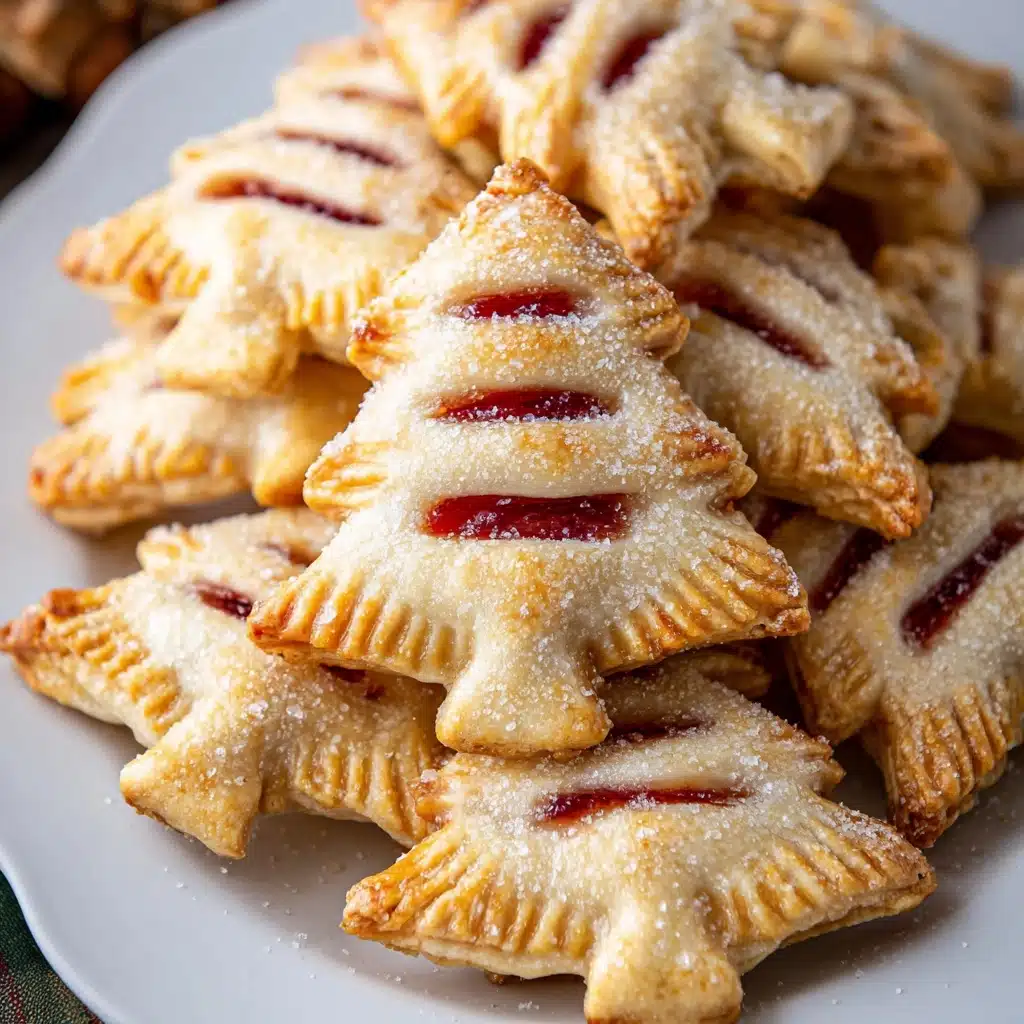
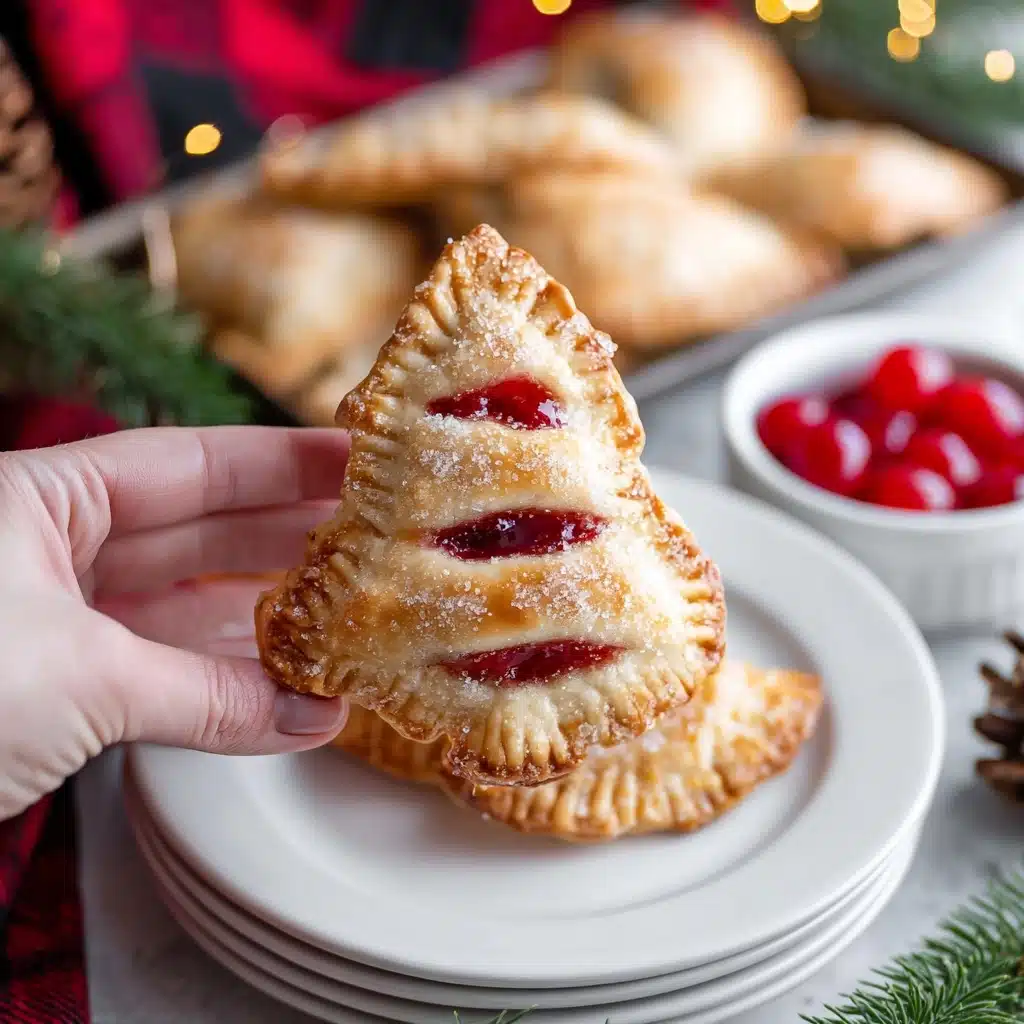
If you are looking for a delightful, handheld treat that bursts with juicy fruitiness and flaky, buttery crust, these Cherry Hand Pies are an absolute dream come true. Each bite offers a perfect harmony of sweet cherry filling enveloped in tender pastry, making them irresistible for dessert lovers and snack enthusiasts alike. These pies are not only visually charming, especially with their holiday tree shape, but they also bring that comforting homemade feeling to every occasion.
Ingredients You’ll Need
The magic of these Cherry Hand Pies lies in a handful of simple, reliable ingredients that combine to create flaky crusts and luscious filling. Each component plays its part: the refrigerated pie crust offers buttery layers without the fuss, the cherry pie filling delivers vibrant sweetness, and the egg wash brings everything together with a golden, glossy finish.
- Refrigerated pie crust: Using three boxes keeps preparation easy and ensures enough dough for plenty of pies.
- Cherry pie filling: The canned filling gives you that classic tart-and-sweet flavor combo and gorgeous ruby color.
- Large eggs: Essential for making a smooth egg wash that helps seal the pies and create a shiny crust.
- Water: Mixed with eggs to perfect the egg wash consistency for brushing.
- Coarse sanding sugar (optional): Adds a sparkling, sweet crunch on top for a festive touch.
How to Make Cherry Hand Pies
Step 1: Prepare Your Oven and Pie Crust
Start by preheating your oven to 350 degrees Fahrenheit so it’s ready when your pies are assembled. Thaw the refrigerated pie crust according to package instructions, ensuring it’s easy to roll without cracking, which is key for that delicate final texture.
Step 2: Set Up Your Work Surface
Line a large cookie sheet with parchment paper to prevent sticking and make cleanup a breeze. Whisk together the eggs and water in a small bowl to create a lovely egg wash, which will add golden color and act as glue for sealing your pies.
Step 3: Roll and Cut Your Dough
Take one thawed crust and gently roll it out to between one-quarter and one-eighth of an inch thick to create an even base for your pies. Use a 3-4 inch holiday tree cookie cutter to cut out as many shapes as you can, then save the scraps for rerolling. This repeat-rolling method maximizes your dough and minimizes waste.
Step 4: Fill Your Hand Pies
Place the dough cutouts on your parchment-lined pan and spoon 1 to 1½ tablespoons of cherry pie filling onto the center of each shape. Brush around the edges with the egg wash to help your top crust adhere perfectly without oozing out the filling.
Step 5: Seal and Vent Your Pies
Carefully place another tree-shaped crust over each filled base, gently pressing the edges together starting at the trunk. Use the tines of a fork to crimp the edges securely, which not only seals in the filling but also gives a charming decorative touch. Don’t forget to cut a few small slits in the top crust to let steam escape during baking.
Step 6: Add Final Touches and Bake
Brush the top of each pie with the remaining egg wash and sprinkle with coarse sanding sugar if you want some sparkle and extra crunch. Bake your pies for 20 to 25 minutes until golden brown, then transfer to a cooling rack. These pies can be enjoyed warm or at room temperature – both ways are fantastic!
How to Serve Cherry Hand Pies
Garnishes
Simple garnishes like a dusting of powdered sugar or a drizzle of vanilla glaze can elevate the presentation and sweetness, pairing beautifully with the bright cherry filling. Fresh mint leaves on the side add a burst of color and a fresh aroma to balance the richness of the pastry.
Side Dishes
For a comforting dessert spread, serve these hand pies alongside a scoop of vanilla ice cream or a dollop of whipped cream. A cup of hot tea or coffee perfectly complements their tender, flaky texture and fruity filling, making for a cozy afternoon treat.
Creative Ways to Present
Cherry Hand Pies are charming enough to be the centerpiece on a dessert platter, especially during holiday gatherings. Try stacking them in a pyramid shape or laying them out on a rustic wooden board with fresh cherries and powdered sugar dusted around for a dramatic effect. You can also wrap a festive ribbon around each one for a cute, edible gift.
Make Ahead and Storage
Storing Leftovers
If you have any leftovers, store them in an airtight container at room temperature for up to two days. This keeps the crust tender and the cherry filling juicy without drying out. Refrigerating is an option but may cause the crust to toughen slightly.
Freezing
These pies freeze beautifully before baking. Assemble as directed, freeze them on the baking sheet until solid, then transfer to a freezer bag for up to three months. When ready to enjoy, bake directly from frozen, adding a few extra minutes to the baking time for perfectly fresh results.
Reheating
To warm your Cherry Hand Pies, pop them in a preheated 350 degrees Fahrenheit oven for 5 to 10 minutes. Avoid microwaving if possible, as the crust will lose its crispness. Oven reheating ensures the filling stays warm and luscious while maintaining a flaky crust.
FAQs
Can I use homemade pie crust instead of refrigerated?
Absolutely! Homemade pie crust will work great and add an extra personal touch. Just make sure to roll it out evenly and keep it chilled so it cuts cleanly for the hand pies.
Is it possible to use fresh cherries for the filling?
Yes, fresh cherries can be used, but you’ll need to cook them down with sugar and a little cornstarch to create that thick, pie-like filling consistency. Canned pie filling offers convenience but fresh cherry filling delivers a fantastic homemade flavor.
Can I make these hand pies in different shapes?
Definitely! While the holiday tree shape is festive, feel free to use any cookie cutter shape you like. Circles, hearts, or stars all work beautifully and add your own flair to the pies.
What can I substitute for the coarse sanding sugar?
If you don’t have coarse sanding sugar, granulated sugar or turbinado sugar can be used for a similar crystalized crunch. Otherwise, a light dusting of powdered sugar after baking gives a lovely sweet finish.
How long do Cherry Hand Pies stay fresh?
When stored properly in an airtight container at room temperature, they stay fresh for about two days. Beyond that, they’re best enjoyed warmed up or frozen for longer storage.
Final Thoughts
There’s something truly special about Cherry Hand Pies that brings warmth and joy to any kitchen. They’re fuss-free to make, wonderfully tasty, and offer that nostalgic feeling of a homemade treat shared with loved ones. I wholeheartedly encourage you to try making these charming little pies—it’s a sweet adventure worth every bite!
PrintCherry Hand Pies Recipe

Delightfully festive and flaky Cherry Hand Pies are the perfect handheld dessert for holiday gatherings. Made with flaky refrigerated pie crusts and sweet cherry pie filling, these charming tree-shaped treats are easy to prepare and bake to golden perfection. Finished with an egg wash and optional coarse sugar sprinkle, they offer a beautiful and delicious way to enjoy classic cherry pie flavors in a convenient, portable form.
- Prep Time: 20 minutes
- Cook Time: 25 minutes
- Total Time: 45 minutes
- Yield: Approximately 20 hand pies 1x
- Category: Dessert, Snack
- Method: Baking
- Cuisine: American
- Diet: Vegetarian
Ingredients
Crust
- 3 boxes refrigerated pie crust (2 crusts each box)
Filling
- 1 can cherry pie filling (21 ounces)
Egg Wash
- 2 large eggs
- 2 tablespoons water
Optional Topping
- Coarse sanding sugar, for sprinkling
Instructions
- Preheat and prepare: Preheat your oven to 350 degrees F (177 degrees C). Thaw the refrigerated pie crusts according to package instructions to ensure they are pliable and ready for rolling.
- Prepare baking sheet and egg wash: Line a large cookie sheet with parchment paper and set aside. In a small bowl, whisk together the eggs and water to create an egg wash; set this mixture aside.
- Roll out crust: Using a rolling pin, roll out one thawed pie crust on a lightly floured surface, making sure there are no cracks or holes. The crust should be rolled to about 1/8 to 1/4 inch thick for optimal flakiness.
- Cut shapes: Use a 3 to 4 inch holiday tree-shaped cookie cutter to cut out approximately 7 tree shapes from the crust. Keep the leftover dough aside for re-rolling. Repeat this process with all six pie crusts, collecting and re-rolling the scraps to make additional hand pies.
- Fill the pies: Arrange half of the cut-out tree shapes on the prepared baking sheet. Spoon 1 to 1 ½ tablespoons of cherry pie filling onto the center of each tree, leaving an edge for sealing. Brush the edges around the filling with egg wash to help seal the pies.
- Top and seal: Carefully place a second tree-shaped crust over each filled base. Starting at the trunk, gently press the edges together without pressing down on the filling. Then use the tines of a fork to firmly crimp the seams all around the edges, creating a secure seal.
- Vent and finish: Using a sharp knife, cut a few small slits in the top crust of each pie to allow steam to escape during baking. Brush the tops with the remaining egg wash and sprinkle with coarse sanding sugar if desired, to add sparkle and sweetness.
- Bake and cool: Bake the hand pies in the preheated oven for 20 to 25 minutes or until the crusts are beautifully golden brown and crisp. Remove from the oven and transfer to a cooling rack. Serve warm or at room temperature for best flavor.
Notes
- For even cooking, make sure all hand pies are roughly the same size.
- You can substitute cherry pie filling with other fruit fillings like apple or blueberry if preferred.
- The leftover dough scraps can be re-rolled carefully to avoid toughening the crust.
- Store any leftovers in an airtight container at room temperature for up to two days or refrigerate for up to a week.
- Reheat pies in a warm oven to restore crispness before serving.
- Optionally, brush with milk or cream instead of egg wash for a different finish.
Nutrition
- Serving Size: 1 hand pie (approximately 70g)
- Calories: 210
- Sugar: 15g
- Sodium: 220mg
- Fat: 10g
- Saturated Fat: 3g
- Unsaturated Fat: 6g
- Trans Fat: 0.1g
- Carbohydrates: 28g
- Fiber: 1g
- Protein: 2g
- Cholesterol: 40mg
Keywords: cherry hand pies, cherry pie, handheld desserts, holiday treats, baked cherry pies