Brownie Refrigerator Cake Recipe
Introduction
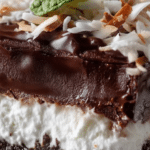
Brownie Refrigerator Cake is a rich and indulgent dessert that combines fudgy brownies with a creamy, fluffy topping. This no-fuss treat is perfect for those who love chocolate and want a make-ahead dessert that’s easy to slice and serve.

Ingredients
- 0.5 cup butter
- 1 cup granulated sugar
- 0.5 cup all-purpose flour
- 0.25 cup unsweetened cocoa powder
- 0.5 teaspoon baking powder
- 0.25 teaspoon salt
- 2 large eggs
- 1 teaspoon vanilla extract
- 1 package cream cheese, softened
- 0.5 cup powdered sugar
- 1 cup heavy cream, whipped
- 0.5 cup chocolate chips (divided)
Instructions
- Step 1: Preheat oven to 350°F (175°C). Grease and flour an 8×8 inch baking pan.
- Step 2: In a large bowl, cream together melted butter and granulated sugar until smooth.
- Step 3: Beat in eggs one at a time, then stir in vanilla extract.
- Step 4: In a separate bowl, whisk together flour, cocoa powder, baking powder, and salt.
- Step 5: Gradually add dry ingredients to the wet ingredients, mixing until just combined.
- Step 6: Spread the batter evenly into the prepared baking pan.
- Step 7: Bake for 25-30 minutes, or until a toothpick inserted into the center comes out with moist crumbs.
- Step 8: Let the brownies cool completely in the pan.
- Step 9: While the brownies cool, prepare the filling by beating together softened cream cheese and powdered sugar in a medium bowl until smooth.
- Step 10: Fold in whipped heavy cream and half of the chocolate chips.
- Step 11: Once the brownies are completely cool, spread the cream cheese mixture evenly over the top.
- Step 12: Sprinkle the remaining chocolate chips over the cream cheese layer.
- Step 13: Refrigerate for at least 2 hours before slicing and serving.
Tips & Variations
- For extra texture, try adding chopped nuts like walnuts or pecans to the brownie batter or topping.
- You can substitute the unsweetened cocoa powder with Dutch-processed cocoa for a smoother chocolate flavor.
- If you prefer a lighter topping, fold in some crushed graham crackers or use whipped topping instead of heavy cream.
Storage
Store brownies covered in the refrigerator for up to 3 days. Keep them chilled to maintain the creamy topping’s texture. When ready to serve, slices can be enjoyed cold or brought to room temperature for about 15 minutes to soften slightly.
How to Serve
Serve this delicious recipe with your favorite sides.
FAQs
Can I use a different size pan?
Yes, you can use a slightly larger or smaller pan, but adjust the baking time accordingly. A larger pan will bake faster and thinner, while a smaller pan may need extra time.
Can I make this dessert ahead of time?
Absolutely! This cake is perfect for making ahead. Refrigerate for at least 2 hours or overnight to allow the flavors to meld and the topping to set firmly.
PrintBrownie Refrigerator Cake Recipe

A decadent Brownie Refrigerator Cake featuring a rich, moist brownie base topped with a creamy, sweetened cream cheese and whipped cream filling studded with chocolate chips. This no-bake topping is chilled to set, creating a luscious dessert perfect for any occasion.
- Prep Time: 20 minutes
- Cook Time: 30 minutes
- Total Time: 2 hours 50 minutes
- Yield: 9 servings 1x
- Category: Dessert
- Method: Baking
- Cuisine: American
Ingredients
Brownie Base
- 0.5 cup butter
- 1 cup granulated sugar
- 0.5 cup all-purpose flour
- 0.25 cup unsweetened cocoa powder
- 0.5 teaspoon baking powder
- 0.25 teaspoon salt
- 2 large eggs
- 1 teaspoon vanilla extract
Cream Cheese Filling
- 1 package cream cheese, softened (8 oz)
- 0.5 cup powdered sugar
- 1 cup heavy cream, whipped
- 0.5 cup chocolate chips, divided
Instructions
- Prepare Oven and Pan: Preheat your oven to 350°F (175°C). Grease and flour an 8×8 inch baking pan to prevent sticking.
- Melt Butter and Mix Sugar: In a large bowl, melt the butter. Then cream together the melted butter and granulated sugar until well combined.
- Add Eggs and Vanilla: Beat in the eggs one at a time to incorporate, followed by stirring in the vanilla extract.
- Combine Dry Ingredients: In a separate bowl, whisk together the flour, unsweetened cocoa powder, baking powder, and salt to evenly distribute the leavening agents and cocoa.
- Mix Wet and Dry Ingredients: Gradually add the dry mixture into the wet ingredients, folding gently until just combined, taking care not to overmix.
- Pour and Bake: Spread the batter evenly into the prepared baking pan and bake for 25-30 minutes. Check doneness by inserting a toothpick; it should come out with moist crumbs.
- Cool the Brownies: Allow the brownie base to cool completely in the pan to ensure the filling sets properly.
- Prepare Cream Cheese Filling: In a medium bowl, beat the softened cream cheese and powdered sugar together until smooth and creamy.
- Fold in Whipped Cream and Chocolate Chips: Gently fold in the whipped heavy cream and half of the chocolate chips into the cream cheese mixture to keep it light and airy.
- Assemble the Cake: Once the brownie base is fully cooled, spread the cream cheese filling evenly over the top.
- Add Topping: Sprinkle the remaining chocolate chips on top for added texture and chocolate flavor.
- Chill: Refrigerate the entire cake for at least 2 hours to allow the filling to set and flavors to meld before slicing and serving.
Notes
- Ensure brownies are completely cooled before adding the cream cheese mixture to prevent melting and separation.
- Use full-fat cream cheese and heavy cream for the best texture and flavor in the filling.
- For a more intense chocolate flavor, consider using semi-sweet or dark chocolate chips.
- This cake can be stored covered in the refrigerator for up to 3 days.
- Allow the cake to sit at room temperature for 10 minutes before slicing for easier cutting.
Keywords: brownie refrigerator cake, no bake topping, chocolate cream cheese filling, easy dessert, chilled dessert